The Silicon Graphics Refrigerator Project

(or: How To Turn a $175.000 High-End SGI Challenge DM Server into a Fridge)

by Matthijs Mourits (mourits@planet.nl)


Introduction
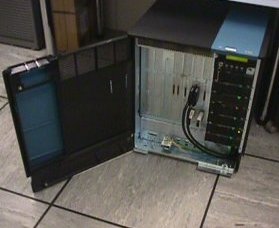
Too much free time will make people do the weirdest things. I've always had a soft spot for obsolete computers, especially when they once cost a small fortune and were the absolute top-of-line in their hey-day but are now hopelessly out-dated. It seems unfair that after only a short time of hard work the reward for their loyalty is to bring them to the junkyard.

When we move away from the boring, low-cost world of ugly WinTel PC's and look at the high-end of the computer market we come across a little computer company called Silicon Graphics Inc. Best know for their powerful workstations like the ever-so-cool Indy, they're the kind of people who don't jerk around when it comes to building a good looking machine. If you look up "Server" in SGI's dictionary it probably says:

Server (n.),
   1. Large, extremely expensive machine that goes "Ping!". Measuring at least 25 cubic feet, heavy, bulky and giving of more heat then a nuclear power plant. It's big, it's bad, it's beautiful and makes it pretty clear what happened to this year's IT-budget.


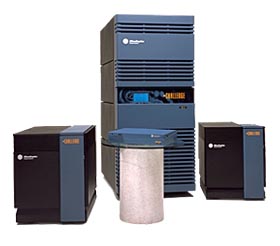
SGI's Challenge-series. The small, flat one is
not an Indy but a Challenge S.

This is Tiga, the other server. All alone now but
with some extra RAM and CPU's
Step 1: How to get one
As it is unlikely you'll find a high-end server at a garage sale your best bet is to start working for the IT department of a large internet company and wait until something breaks down... well, that's what I did.

When one of our two Challenge DM servers broke down it was decided to strip the now-deceased monster, Dua it was called, of it's vital organs (i.e. memory, cpu's, power supply etc.) and throw it away. So it was carried out the door and put next to the garbage containers only to be hauled back in again just 3 minutes later by my colleague and me.

At that moment I had a vision. A vision of world where server and refrigerator could co-exist. The clouds broke and a beam of sunlight hit me. The angels sang and...well, you know, sort of like that scene from The Blues Brothers. "This will be my new project!", I proclaimed and took it home. That evening, a pretty funny situation occurred when our CEO was standing in the parking lot with a business client. As they talked they saw two guys come out of the front entrance and throw a rather expensive-looking server rather ungently in the back of a Volkswagen and drive off. ;-))

Step 2: Remove the nasty bits
What you need is a screwdriver and an electric drill to drill out all the rivets. And this thing has a lot of rivets! Every part is made of thick platted steel and securely bolted together. The engineers probably thought it would be a nice feature to use it as a safe if it ever broke down.

It was great fun to take out the guts this machine. Of course it's always fun to take something apart but it also shows you how well this thing is put together and how every piece is part of a complex ventilation system. To avoid disrupting the airflow you have to place plastic dummy-boards when system-boards are removed. The main ventilator (the power-supply has 2 ventilators of it's own) is so big it takes up most of the lower part of the cabinet.


Doesn't look quite as impressive now, does it?


Yes, I live above a computer shop. Where else
would I live?


Step 3: Throw the nasty bits out with the trash
It seems incredible that I could fill over 3 garbage bags with the stuff that came out of this server, even with the system-boards already removed. And it wasn't easy either because I cut myself several times on some razor-sharp metal parts. No child-safety certificate for the Challenge I'm afraid. The point of this picture is to show you that you can't tell from the outside if somebody placed around $60.000,- worth of garbage in front of his house. (That's $20.000,- a bag)
Step 4: Find a refrigerator that fits
This part could be tricky. I was thinking of a camping-style fridge or maybe a mini-bar like the ones you see in hotel rooms. But I was very lucky and a good friend of mine told me had just the sort of fridge I was looking for and he didn't use it anymore. I measured the width and height and it fitted perfectly! Almost as if they were made for each other.

It runs on normal 220 volts and it operates in complete silence. This is very nice if you're just interested in the fridge but I didn't want my server to come over all shy and polite. So this "problem" was later fixed by mounting one of the server's rather large fans on the rear-panel to get that essential "humming"-sound you would expect from a hard-working computer.

Another nice feature is the ability to make ice cubes by placing the two little ice cube trays on top of the cooling element.


The fridge

The wheels, their replacements and one of the rails


Step 5: Make some modifications
The fridge was the same width as the server cabinet but the front wheels were in the way. So with a little help of the electric drill they had to go. To keep it mobile (and to prevent it from severely scratching my hardwood floor) I placed two smaller wheels underneath the cabinet.

After that I placed two aluminium rails on the bottom to provide an even base for the fridge to stand on. These rails also made it a lot easier to put the fridge in and take it out again. This happened about 800 times.

Step 6: Connect all the electronic bits
I thought it would be fun to use as much of the original parts as possible. Because of the high quality of these parts I hope they will provide at least a 99,9 % uptime and make sure my beer-server will be online 24/7.

The AC connector did not fit the standard Euro-style power cord so it had to be replaced. I kept the other interesting looking stuff and you'll be happy to know that this baby is electronically secured by a 13 ampere fuse switch. For those of you who don't have a clue what that means: It means this fridge will probably sooner blow up before it's fuse is tripped. But it's the thought that counts.

After the fuse switch comes a normal extension cord for the refrigerator and a 12-volt AC/DC adapter. This drives the fan on the back panel and the two extremely useless LED's on the front panel. (See next picture) The LED's should have been labelled GNDN* but instead I tell people the red led starts flashing when the beer supply runs low. ;-))


(*Goes Nowhere, Does Nothing)


Good thing this fridge has a 13 ampere fuse, just to
be on the safe side


Fridge status: all functions nominal


Step 7: The finishing touch
I spend a great deal of time just figuring out how I would mount the door of the fridge on to the front door of the cabinet and how to cover up the gaps at the top and the side. It worked out pretty well. After some modifications a grid that came out of the cabinet was replaced, now with two cool looking LED's on the front, which are completely pointless.

After that the only thing left to be done was making sure the door closed nice and easy and drive some screws through the cabinet to secure it.

And finally...
(click here for appropriate music)

Copyright © 2001 Matthijs Mourits. All rights reversed.